Configuring logical network segregation is a fundamental principle in network security—and the focus of this month’s topic. I’ve recently been expanding and reorganizing my home network, moving most of the equipment into a structured media cabinet in my closet to free up space in my spare bedroom/office. As part of this effort, I also added TP-Link managed switches to serve as access layer switches and improve overall network management. This home project is what inspired this month’s deep dive into logical segregation and its benefits.
By implementing logical segregation, organizations can reduce the risk of lateral movement if an attacker gains a foothold within the environment. This strategy ensures that any compromise is contained to a specific segment, limiting exposure and helping to prevent threats from spreading across the network.
Taking this a step further, micro-segmentation can be introduced as an advanced security measure. While I haven’t had the opportunity to configure it personally, I’ll briefly discuss it from a theoretical standpoint. Micro-segmentation involves establishing highly granular security zones, enabling stricter access controls between devices to enhance containment and further minimize the attack surface. Unlike traditional security approaches that apply controls at the network zone level, micro-segmentation enforces policies at a more detailed, port-based level. It can also include conditional access requirements—such as mandating the presence of an endpoint detection and response (EDR) solution or antivirus software, or restricting access to only certain operating system versions—before allowing network communication.
Configuring logical separation can start at a very basic level. On my home network, I’ve set up several Virtual Local Area Networks (VLANs), each designated for a specific purpose. I also have my network configured in a two-tier architecture using a router-on-a-stick. Devices on my network connect to access ports on edge switches that are TP-Link Smart Managed. These edge switches have trunk ports configured that connect back to my core switch, a MikroTik CSS610. These trunk ports carry all tagged VLAN traffic from the core switch to my router—a MikroTik L009.
For example, my VLAN configuration includes a dedicated IoT VLAN that segments cameras and smart home devices from the rest of the network. This VLAN is isolated and only permits outbound communication—devices within it cannot initiate connections to other VLANs. If needed, I could review the network traffic of these devices and create more restrictive rules, allowing outbound access only to sanctioned IPs, URLs, or specific ports. However, since this is my home environment, I find that level of control unnecessarily time-consuming, so I leave outbound traffic open by default. In an enterprise scenario, though, this type of granular control would typically be enforced as a standard security practice.
My everyday computer resides on a more trusted network segment with broader access. I consider this segment more secure, as it’s under my direct control and used for managing the network. It has full access to all network management interfaces and can reach any device on any other VLAN, allowing me to configure and monitor all aspects of my home network.
To summarize, configuring logical network segmentation offers several benefits to overall security. It helps reduce an organization’s attack surface by limiting allowed connections between specific internal or external zones. This approach decreases the risk of lateral movement within the network and can prevent attackers from establishing command-and-control (C2) communications—especially when outbound traffic is restricted to only sanctioned IPs or URLs from designated zones.
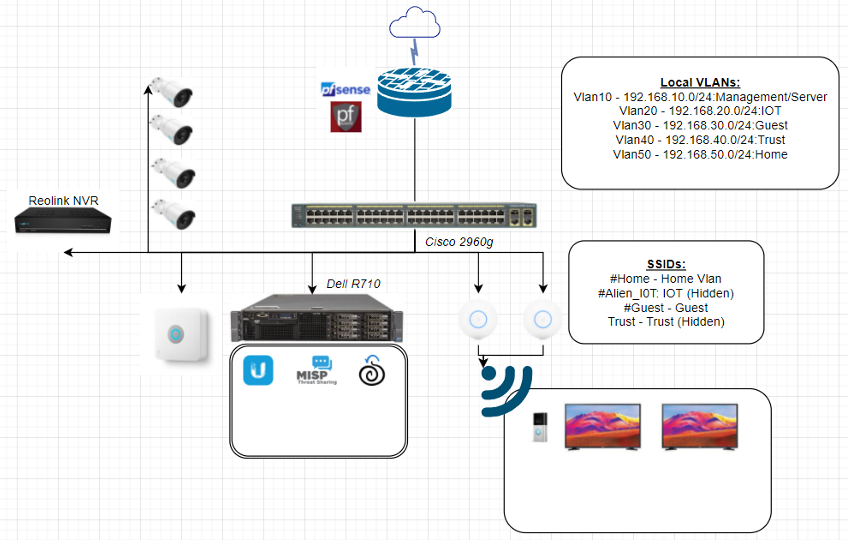
I’ve included a basic older network architecture diagram from my home setup, dating back to around 2021 for review. While the design has evolved significantly over the past five years and the drawing could be a little more granular, the foundational concepts remain relevant. The diagram illustrates the various VLANs I had configured at the time, along with the use of Security Onion and pfSense for network monitoring and traffic inspection.
As a side note, I highly recommend that anyone starting out in networking or cybersecurity deploy these types of devices—either in a virtual lab or within a home network. Having the freedom to experiment and even break things in a safe environment is incredibly valuable for hands-on learning and professional development. While the specific technologies may evolve in professional settings, the core concepts and troubleshooting skills you develop through this kind of practice tend to remain consistent and transferable.
I’m planning for the next post to be a lab walkthrough, as it’s been a while since I’ve done one—mainly because I’ve been focused on studying for my CIPP/US.